
 The day H started kindergarten, our schedule started filling up and it hasn't stopped since. I expected calendars full of extra-curricular activities by 3rd or 4th grade, but not this soon. I can only imagine how much busier life will be when she's actually in 3rd grade, and J is starting kindergarten.
Ballet, sports, after-school projects, playdates...these are all good things, but some days, this surge in afternoon activities leaves little room for dinner preparation. I've always been a lazy cook, so I have several quick-prep recipes up my sleeve. I created a new one last week, and everyone gobbled it up and asked for more, so I figured it would be a good one to share with you.
This focaccia is made in a bread machine. You can make it by hand, of course (not that I've ever tried), but with a bread machine, you just throw in the ingredients, turn it on, and walk away. When it beeps, you take out the dough, give it just a little more attention, and pop it in the oven. That's it.
I should say here that I'm calling this "focaccia" because it's similar to the loaves of focaccia I buy in the store. I should probably just call it "herbed bread" because there could be some necessary focaccia ingredient or method that I'm overlooking. Please, if you know how to make real focaccia and you see something wrong with my recipe, do let me know. I like to learn these things.
 Focaccia a la Bread Machine
(all ingredients should be at room temperature--70°-80°F)
1/2 teaspoon salt
1 tablespoon dried basil
2 teaspoons dried oregano
1 teaspoon dried thyme
1 tablespoon dried minced garlic (or 1 teaspoon garlic powder or 1 teaspoon fresh minced garlic)
1 tablespoon dried minced onion
3 cups all-purpose flour
1 1/2 teaspoons active dry yeast
1 cup water (again, room temperature for bread machines)
2 tablespoons olive oil (plus extra for brushing)
Toppings:
1 cup shredded mozzarella cheese
1/4 cup chopped green onions (or whatever else you want to put on top--olives, artichokes, sun dried tomatoes, etc.)
Marinara sauce for dipping
- Place all bread ingredients (so, everything except cheese, green onions, and marinara) into bread machine pan--in the order given.
- Do not combine yeast with water if you are setting a delay timer. If you're not going to mix the dough right away, make a well in the flour to hold the yeast, and pour the water around the outside of the flour. You don't want the flour and water to mix until the bread machine turns on.
- Set your bread machine to the Dough setting and press start. Let it do its work. Mine takes an hour and a half, yours may be different. Should be plenty of time to read some stories, run to basketball practice, or head to the dentist.
- When the bread machine is completely finished, remove the dough. You may want to flour your hands a bit.
- Stretch the dough with your hands a bit until it's the size you want. Mine was a rustic 12" in diameter.
- Place dough on a lightly oiled pan--a pizza pan works great, but a cookie sheet would work just as well.
- Once on the pan, you may want to make some adjustments to the size or shape of your dough. Be sure it is of an even thickness so it will cook evenly.
- Brush the top of the dough with olive oil, if desired. Top with shredded cheese and chopped onions.
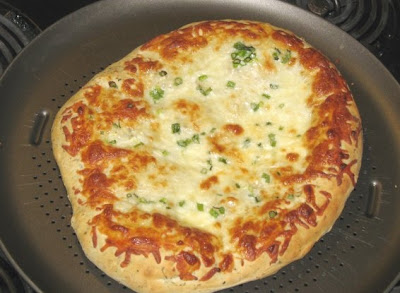
- Bake at 450° for 10-15 minutes, or until the cheese is golden brown around the edges. It should look like this:*
 Cut into wedges or strips and serve with marinara sauce for dipping. (This is a great use for leftover marinara.) Add a salad or veggie sticks and you're good to go! Should serve 2 adults and 2 young children.

 Look at all that herby yumminess.
 *I know what you're thinking. "It's just a cheese pizza with an herby crust." It is indeed. Take out the herbs, garlic, and onion and this is my homemade pizza crust recipe. It's yummy, and you should try it that way, too. But be warned: loading it up with toppings takes a little more time.