Showing posts with label printables. Show all posts

16 January 2012

16/366 history

As I posted on the MakeHappy Facebook page last night, I gave the kids a small lesson today in honor of Dr. Martin Luther King, Jr. At ages 4 and 7, I didn't have high expectations, but wanted to get the ideas of unity and equality across.

Sweetpea surprised me. She knew quite a bit about Dr. King. Kudos to her teachers at school! Little Mister knew nothing, and was pretty resistant to my lesson. For him, I kept it simple. I gave a little background on the mistreatment of people who looked different and discussed why that is wrong. We watched a short clip of Dr. King's “I Have a Dream” speech, so they could see who we were talking about and hear his powerful voice. (I also used this transcript.) We talked about how he encouraged others to stand up peacefully with him for what they believed and how, together, they helped to change our country for the better.

Then we did a little craft to, hopefully, cement the lesson. I made up a little printable of people holding hands (thank you, Photoshop auto shapes). I dramatically poured out all our crayons on the table and had them sort through to find all the colors that could be used for skin. 

Little Mister chose red. I was confused, and asked him why he chose that color.

“Because cheeks get red when we're warm and when we exercise.”

Good point! We gave all his people red cheeks. He was very resistant to the coloring, as it's not his favorite activity, but he offered to add green and yellow Oregon Ducks gear after I filled in the skin colors. Funny kid. Go Ducks!


As for my girl, well, she never ceases to amaze me. She has such a big heart. I love what she came up with for her people.


We usually do a small service project on this school holiday, and had planned to walk our route from home to school with a garbage bag and latex gloves, gathering littered wrappers to improve our community. But with a layer of snow on the ground, that would be difficult, so we're postponing it for the next dry day after the thaw.

Do you do anything to celebrate Dr. King? I'd love to hear about other kid-appropriate projects.

If you're interested, I made our printable into a pdf to share. 
Just click the link below the image. 
Download MakeHappy's People Holding Hands PDF

(If you're having trouble opening it, you may need to download Adobe Acrobat Reader. It's free.)

23 November 2011

thanksgiving and the giveaway winner

Tomorrow in the US is my favorite holiday.
Thanksgiving!

I am thankful for so many things—
home, security, two challenging and rewarding children, a patient husband, good health. . . 
I really could go on all day.

But today, I am thankful for you.
Thank you for commenting, for trying my thrown-together recipes, for coming 
back time and again to listen to me ramble.
Thank you.

I have a little something for you.
Something to keep the kids out of your hair for at least five minutes while you
are cooking/entertaining/relaxing tomorrow.
Click and print.
(When you click on the picture, it will link to a Google Document for printing.)
Enjoy!


One more thing—
we have a giveaway winner to announce!
Congratulations to commenter #9:
Kimberly W!
Congratulations Kimberly.
You will be contacted via email with further instructions to receive your calendar.

Thank you all for participating!
Have a great weekend.

05 September 2011

back to school

I'm sure most of you start the back-to-school routine tomorrow. We start ours a little early in these parts. (No, it wasn't today.) I do love the lack of alarm clocks that comes with summer, but I'm so glad to have the kids back in school. They had a little too much together time this summer.

Hubs usually goes into work a few minutes late on the first day, so he can walk to school with us and check out the new classrooms. The kids love it.


 I printed out these jokes from All for the Boys as a first day icebreaker.
With her teacher's permission, she read them to the class and they were a big hit!
After we got Sweetpea settled in, Little Mister and I took a long walk/stroller ride and stopped at the park for some one-on-one time. I forgot what a sweet boy he can be when he doesn't have a sister around to torment.


Happy Labor Day to you all 
and hope your first day of school gets an A+!

18 October 2010

Portable Halloween Jokes

 (I promise my photo isn't blurry. The joke cards printed that way.)

As soon as I saw these printable Halloween jokes on Live Laugh Love Grow, I printed them out for my Sweetpea. She's six, and she loves jokes. She frequently tries to make up her own, and occasionally they're even funny! 

Their suggested use is lunchbox surprises, but I was thinking Sweetpea would like to take them to school and give them to her friends. But then there could be jealousy, hurt feelings, "I wanted the 'roller ghoster' one!" You know how it goes. 

So instead I punched a hole in the corner of each card, reinforced the holes with those handy circle reinforcements and slipped them onto a keyring.

Now Sweetpea has a pack of Halloween jokes, ready to share (verbally). She was so excited when I gave them to her, laughing and saying, "Mom! Mom. Listen to this! It's so funny!" for each one.

I'm clinging–clinging, I tell you–to these times when I can make her day with such a simple gift. I know that will slowly disappear.

Thanks to Allison for the printable. Head over to Live Laugh Love Grow and print some out for your kiddos!

04 October 2010

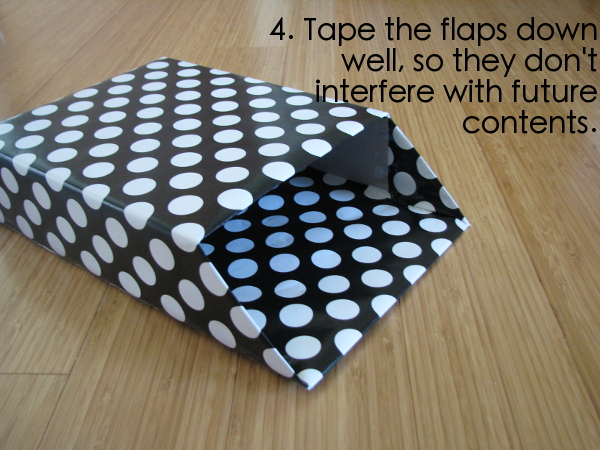
recycled: cereal box to project holder

With my Little Mister in preschool just two days a week, it leaves us three days with Big Sister at school, Daddy at work, and the house to ourselves. Storytime at our local library (the best one in the world) is our regular Wednesday activity, so that leaves us Monday and Friday to do "projects." 

A "project" for 3yr old Little Mister can be any kind of simple craft activity. The "sticker story" I posted two weeks ago is a perfect example. Coloring sheets, free stickers from junk mail, junk mail itself (for scissor practice)–all go in the project box. Often I'll find a gem (read: a really fabulous printable) from One Pretty Thing's "Kid's Printable Roundup." Fabulous resource. 

Other great printables:

Right, right, back to my point. I collect these things throughout the week, and needed a place to store them. So I grabbed a cereal box from the recycling bin (my go-to for emergency crafts) and got crafting. 

I think it's pretty self-explanatory. I labeled the process, step by step on the photos. Let me know if you have any questions.


17 February 2010

150 posts=free printable!

Yes, you! YOU rock! make*happy is now 150 posts old, and to thank you 2 or 3 non-family readers, I'm offering my first free printable below. Thanks for reading, and BIG thanks to those of you who have offered wonderful comments. I love comments. :)

The card above was my valentine to Hubs. It, and the printable below, was inspired by a Paper Crafts mailer I received last week. (They have some great ideas over there...you should check out their blog.)

And here is my valentine for H. I had another idea in mind, but then I saw a commercial with a paper doll chain and wanted to try it. It was my first time cutting paper dolls and it was really fun. I love my Xacto knife, but sometimes it's nice to just sit with scissors and paper in hand. Very old school.
But you don't care about that...you want your free stuff! OK, here it is.

Now, this is my first time posting a printable this way, so please, please comment and let me know if it works or not. I'd like to do this again, but I have to make sure the instructions are easy to follow and the product turns out as it should.

Instructions:
  • Click on the image for the full size jpeg (in a new tab or window, so you can still see these instructions)
  • Right click on image
  • Click "save image as..." and save somewhere you can find it (I use my desktop, but you might have a special place for downloads)
  • Open the file in an image viewer that has a print option (Paint, Microsoft Office Picture Manager, Photoshop, etc.)
  • If applicable, set print margins to 0.5" or less
  • Print on desired color cardstock
  • Cut
*Note that the image is reversed. It is supposed to be like that, I promise. That way, when you cut out the letters, you won't have to worry about any lines showing on the front of the letter. Clever, eh? :)


Here's what it would look like if it were not reversed (don't print the image below):


Would you like some suggestions for how to use these words? You would? OK. Use them on a card, a gift tag, in a scrapbook, or just for a cute little sign to hang up somewhere random--like your calendar. Here are some suggested sayings, with the printable words in bold:
  • Hope your party rocks
  • You rock
  • Make a wish
  • Happy birthday to you
  • thank you
  • thanks bunches/a million/for being you
  • it's a boy/girl
  • time to party
Yeah, you get the idea. Let me know if you need some more suggestions for specific words. I can help you brainstorm.

Have fun with it! (And really, let me know how the printing process goes.)